New Fluid Bed

ScottV

New member
Joined
May 14, 2010
Messages
1,942
Location
Collinsville, MS
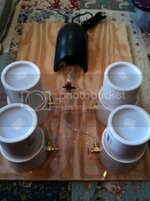
I just finished my home made fluid bed and it's working fine. I saw that Stump Hunter just finished his also. Mine has got 4 fluid beds on it so I won't have to change cups as much. I just tried out two of them, one with chartreuce and the other with white and they work good. I found out that after you dump your paint in and open air valve, you need to stir the powder for it to bubble correctly. I'm getting a thinner coating of paint on my heads now.
0ecc32ab.jpg
 

crappiecripplerjigs

New member
Joined
Apr 7, 2010
Messages
548
Looks like a great set up. Fairly simple to build I would guess judging by the materials shown?? Feel free to send me some directions! Good job.
 

hunter7711

New member
Joined
May 29, 2010
Messages
773
Location
St. Joseph, MO
Nice job Scott. Still fighting the volcanoes on mine. What's funny is it's only a few of the cups. Several work just fine.
 

ScottV

New member
Joined
May 14, 2010
Messages
1,942
Location
Collinsville, MS
hunter7711 said:
Nice job Scott. Still fighting the volcanoes on mine. What's funny is it's only a few of the cups. Several work just fine.

I've noticed that some powders are a liitle different consistency from others. Maybe that is why some bubble good and some "volcano". My chartreuse bubbles perfectly but the white not as good. I stirred the white a little more and it did better.
 

ragged edge

New member
Joined
May 2, 2010
Messages
582
Location
Los Lunas NM
I think red, white and black are a little thicker colors.......Nice job Scott. did you ever figure out why your jig head was bleeding ?
 

ScottV

New member
Joined
May 14, 2010
Messages
1,942
Location
Collinsville, MS
ragged edge said:
I think red, white and black are a little thicker colors.......Nice job Scott. did you ever figure out why your jig head was bleeding ?

I think it was just the fact that "Candy Yellow" is a thin clear-like color and needs to be placed over a white base coat. I started curing it at a lower temp and that helped. I believe for spider rigging where I'm not casting onto rocks and stuff, I'd be ok not curing at all.
 

StumpHunter

Active member
Joined
May 16, 2010
Messages
5,990
Location
Piedmont, S.C.
Your bed came out nice Scott. I like the four beds with the color already in them ans ready yo go ;) Since I only have two colors I'm not having a problem with one bed :D that will be changing soon.
I went ahead and made 10 cups but I think I'm going to make some taller. I cut my cups 2'', think 2 1/2 or 3'' would work better when stirring the paint.
 

hunter7711

New member
Joined
May 29, 2010
Messages
773
Location
St. Joseph, MO
Hey Scott. I can't find the caps anywhere down here. Where did you get them, and where at in the store. What are they called? I've checked both Lowes and Home Depot.
 

ScottV

New member
Joined
May 14, 2010
Messages
1,942
Location
Collinsville, MS
hunter7711 said:
One last question. Will your air supply run more that one cup at a time?

Yea, the air pump has two outlets to it and I have a "t" in each of those lines so I have two cups per outlet. I mainly did it that way in case I wanted to dip in one color then another color while the head is still hot. I tried it with candy yellow over a white base coat and it worked fine. I'm sure I'll never have more than two going at one time though. Also I did get the caps at Lowes in Meridian. It was where all the PVC fittings are in the plumbing section.
 

Jiggin Joe

New member
Joined
Mar 25, 2010
Messages
238
Location
Owatonna MN
yeah i was gonna use teh test caps but they fit loose in my cups for some reason so i just used cling wrap and rubber bands :(
 

Slabo

New member
Joined
Jun 27, 2010
Messages
1
What are you using for the filter in the bottom of the cup? And where did you get it?
 

ScottV

New member
Joined
May 14, 2010
Messages
1,942
Location
Collinsville, MS
Slabo, on mine I put a bead of silicone around the bottom of my cups and press them onto a coffee filter. After 12 hrs. or so, I trim off the excess and they have worked fine. Like hunter said, some folks use the brown paper lunch bags without problems.
 

toadfrog

Active member
Joined
Jun 28, 2010
Messages
2,811
Location
OKLAHOMA
You can add a few drops of water to the silicone stir it in and it will be ready and set in 15 min. Also on the air supply each cup should be connected to the other sort of a complete circuit. Even though there is two outlets on the pump the air pressure needs to meet and become stable. Should stop the volcanos.
 

Iowabucks

New member
Joined
Jun 11, 2010
Messages
7
Location
SE Iowa
I made my own fluid bed here recently too. I am also fighting the volcanos. But mine seem to be on the side of the cup the air is blowing towards.

Do you think if i could get the air to point down once it gets into the cup that it may spread around inside more evenly and not have so many volcanoes?
 

toadfrog

Active member
Joined
Jun 28, 2010
Messages
2,811
Location
OKLAHOMA
Iowabucks said:
I made my own fluid bed here recently too. I am also fighting the volcanos. But mine seem to be on the side of the cup the air is blowing towards.

Do you think if i could get the air to point down once it gets into the cup that it may spread around inside more evenly and not have so many volcanoes?
You might be able to use a small air defuser like an aquairium stone inside the base of the cup.Thats just a guess off the top of my head.
 
Back
Top