Tying and painting bench build

StumpHunter

Active member
Joined
May 16, 2010
Messages
5,990
Location
Piedmont, S.C.
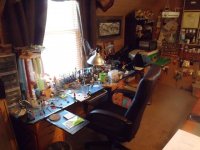
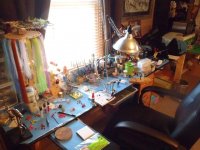
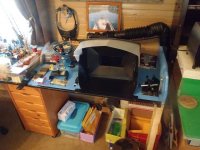
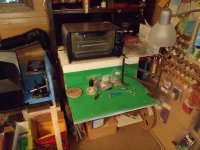
Well I been tying in the corner of the room long enough so I spent some time building a new tying, airbrushing, powder painting bench. :icon14: Moved my tying area from the corner to in front of the window so I can see the world go by as I work, sure is a lot better. Everything has been laid out to give room for each process I want to work on. So far it is working out very well. Have tied a little over 2000 jigs since the move out of the corner two weeks ago and with the added elbow room life is easier :)
 

Attachments

  • Tying desk 001.JPG
    Tying desk 001.JPG
    138.7 KB · Views: 138
  • Tying desk 003.JPG
    Tying desk 003.JPG
    153.2 KB · Views: 138
  • Tying desk 005.JPG
    Tying desk 005.JPG
    145.3 KB · Views: 137
  • Tying desk 006.JPG
    Tying desk 006.JPG
    146.2 KB · Views: 137

Bucko

New member
Joined
May 26, 2013
Messages
734
Location
Eau Claire, Wisconsin
very nice. my summer goal is to setup an area in my garage like that too. my area is do unorganized that I lose t things constantly.
 

Lost Pole

New member
Joined
Nov 11, 2010
Messages
1,858
Location
Pearl River, LA.
I'd cringe at the thought of tying 2000 jigs, but that set up with your materials and experience MIGHT make it tolerable.
Very cozy looking spot and I'm happy you found it and it's working for you.
 

JUNGLEJIM1

Well-known member
Joined
Mar 23, 2010
Messages
3,176
Location
Saint Louis,Mo
Really nice set up. Most important at the tying desk is a big comfy chair which makes a big difference on the long tying days with the big window to let in some air and daylight. Don't get much better than that set up, you're ready for anything.
 

Kdog

Moderator
Joined
Apr 26, 2013
Messages
1,808
Location
SW Ohio
Nice set up! Only problem I see is the missus sees all that on display, she will have a conniption fit.
 

Pup

Active member
Joined
Mar 24, 2010
Messages
3,487
Location
Indianapolis, IN
Very nice work area SH. :cool: I like the idea of lengthening your tabletop (bench) as you and Jay Wirth have done. Your chair does look comfortable. :icon14:

Won't happen in my tying room. It's the size of a small walk-in closet. :)
 

fishindad

New member
Joined
Mar 6, 2014
Messages
125
What do you have your flashabou hanging on? I like that idea. Its the circular item in the photo.
 

StumpHunter

Active member
Joined
May 16, 2010
Messages
5,990
Location
Piedmont, S.C.
Thanks guys, it has been a long time coming.

Fishindad, I took a 1/4'' piece of plywood and cut a 12'' circle. Drilled 2 small holes at every 1-1/2'' so a small zip-tie would fit into the holes to hold the flash. In the center on the circle I drilled a 1/4'' hole to mount the holder to a 1 x 3/4'' x 12'' long board and used a few washers to space the two apart so the holder would be able to turn easy. The 1 x 3/4'' x 12'' can be attached to anything. On my desk it is attached to a 24'' 2 x 4 that is attached to my desk.
 

Pepop

Active member
Joined
Feb 2, 2013
Messages
1,667
Location
Chandler, Texas
GREAT setup! I love the "pull-out" scrap tray & the halogen (I guess) light attached to your vise base! COOL!


Sent from my iPad using Tapatalk
 

walleyetracker85

New member
Joined
Apr 4, 2014
Messages
19
Hey stumphunter I can't view your pics. It has a x through them. Any ideas why this is and how to fix it? I would love to see your pics. If you wantyou could email them to me. Just let me know thanks
 

StumpHunter

Active member
Joined
May 16, 2010
Messages
5,990
Location
Piedmont, S.C.
Looks like you just joined JigCraft, welcome aboard. My pictures can only be seen by signed in members but you should be able to see them now that you have joined. One of the moderators here may be able to answer your question of why you can't see them.
 

LedHed

Sponsor
Joined
Mar 23, 2010
Messages
5,146
Location
So Cal I.E.
Inspiring Ronnie - got me cleaning up my mess - again. Excellent work station - got my vise in front of a window too.
 
Back
Top