AndyLane
New member
Thought I would share something fun and easy to make with your kids or grand kids. Yesterday we were stuck in the house cause mother nature was dumping more snow on us. My son and I were getting bored and I'm pretty sure getting on Momma's nerves so we went to the basement to fiddle with fishing stuff. I thought it would be fun to make some slip floats so I showed him an easy way to do it. Normally If I were wanting to make wooden slip floats I would break out the mini lathe and a dremel tool but you certainly don't need them.
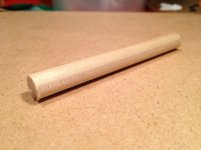
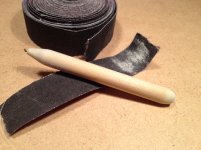
First cut a few 3 or 4 inch pieces of dowel rod. These are made from 3/8 poplar dowel but lighter and softer wood dowels may be better.
View attachment 6
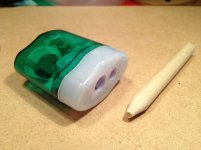
Taper one end of the dowel almost to a point and taper the other end just a little. You can use sandpaper or a wood carving knife to do this but I use a pencil sharpener. (This is why I call them Pencil floats) Its a lot easier and safer for kids to get a good taper using the pencil sharpener.
View attachment 7
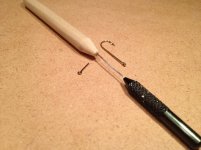
You're going to need an eyelet for the line to run through. I prefer cutting the end off a hook but you can also use screw eyelets. I'm sure other things can be used for this as well.
Use a drill, needle or bodkin to put a small hole in the tip of the float.
View attachment 9
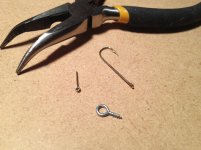
Grab the eyelet with pliers or forceps. Put a few drops of super glue on it and push or screw it into the end of the float and let dry.
Now it just needs a little sanding to smooth and round things off. I prefer using rolled sanding strips because they are flexible and easier to sand small curves.
View attachment 3
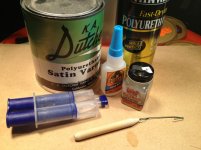
This step is not really that necessary but will make them last longer and take paint better. Coat the float with some kind of sealant. Polys are Ideal but the fumes are bad and you have to wait 24 hours to dry. Easiest and cheapest way is to brush on a layer of CA Glue,super glue or epoxy. hang it and let dry. We used a one part epoxy for this.
View attachment 4
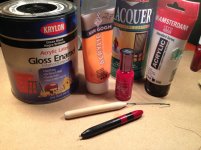
Now the fun part. Get em painted! You can use whatever paint or method you prefer. Give them a good base coat first then use some bright colored paint to paint the top. Maybe add a couple stripes. I like em to either be black with orange/red at the top or just paint the top orange/red and leave the rest natural wood
View attachment 5
When they are dry brush on some epoxy or even some Sallys top coat and let dry.
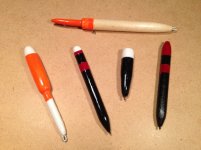
My son enjoyed making these and can't wait to try them on the water.
These are a few he made.
View attachment 6
My son and I were getting bored and I'm pretty sure getting on Momma's nerves so we went to the basement to fiddle with fishing stuff. I thought it would be fun to make some slip floats so I showed him an easy way to do it. Normally If I were wanting to make wooden slip floats I would break out the mini lathe and a dremel tool but you certainly don't need them.First cut a few 3 or 4 inch pieces of dowel rod. These are made from 3/8 poplar dowel but lighter and softer wood dowels may be better.
View attachment 6
Taper one end of the dowel almost to a point and taper the other end just a little. You can use sandpaper or a wood carving knife to do this but I use a pencil sharpener. (This is why I call them Pencil floats) Its a lot easier and safer for kids to get a good taper using the pencil sharpener.
View attachment 7
You're going to need an eyelet for the line to run through. I prefer cutting the end off a hook but you can also use screw eyelets. I'm sure other things can be used for this as well.
Use a drill, needle or bodkin to put a small hole in the tip of the float.
View attachment 9
Grab the eyelet with pliers or forceps. Put a few drops of super glue on it and push or screw it into the end of the float and let dry.
Now it just needs a little sanding to smooth and round things off. I prefer using rolled sanding strips because they are flexible and easier to sand small curves.
View attachment 3
This step is not really that necessary but will make them last longer and take paint better. Coat the float with some kind of sealant. Polys are Ideal but the fumes are bad and you have to wait 24 hours to dry. Easiest and cheapest way is to brush on a layer of CA Glue,super glue or epoxy. hang it and let dry. We used a one part epoxy for this.
View attachment 4
Now the fun part. Get em painted! You can use whatever paint or method you prefer. Give them a good base coat first then use some bright colored paint to paint the top. Maybe add a couple stripes. I like em to either be black with orange/red at the top or just paint the top orange/red and leave the rest natural wood
View attachment 5
When they are dry brush on some epoxy or even some Sallys top coat and let dry.
My son enjoyed making these and can't wait to try them on the water.
These are a few he made.
View attachment 6