tying the wool jig

redear

Active member
Joined
Jun 24, 2010
Messages
1,297
Location
Waverly, Va.
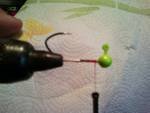
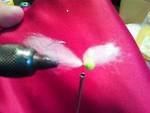
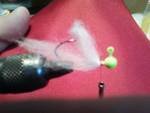
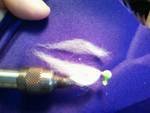
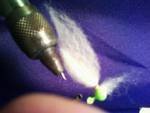
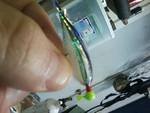
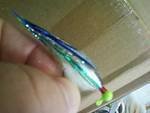
I didn't have much time this evening because I had to start dinner after this but I wanted to show how I have been tying the wool jig, remember proportion is everything and I don't claim to be doing it the best way, but some people have liked the profile of my jigs, you can adjust the proportions of your wool to fit your needs. I only had time to tie in the wool and didn't finish trimming the wool around the head, but you'll get the jist of the process I use.

- Edit by AtticaFish: Larger photos at Wool Jig -
 

Attachments

  • tnstart.jpg
    tnstart.jpg
    2.9 KB · Views: 272
  • tntying wool in.jpg
    tntying wool in.jpg
    3 KB · Views: 269
  • tnfolding back.jpg
    tnfolding back.jpg
    2.8 KB · Views: 274
  • tnsecond wool peice.jpg
    tnsecond wool peice.jpg
    3.1 KB · Views: 270
  • tntied in.jpg
    tntied in.jpg
    3 KB · Views: 270

redear

Active member
Joined
Jun 24, 2010
Messages
1,297
Location
Waverly, Va.
first pic the thread is started, then second pic a proper hank of wool is tied in behind the head with just a few wraps pf 70 denier thread, the butt section of the wool is overlapping the jighead about 1/2", nthied pic shows the wool overlapping the jighead being pulled back towards the tail of the jig and the thread wrapped over it at the neck of the jig to secure it, after stroking the folded back peice of wool towards the back of the jig it will blend in with the rest of the wool but there will be more bulk between the jighead and the bend of the hook. fourth pic shows a very slender hank of wool redied to tie in so it rides along the backbone of the hooks shank, fifth pic shows the completed wool body minus the trimming around the head from the last peice of wool, I do this with a single sided razor blade, pressing against the wool and using the jighead as a backstop, I use liquid vinyl paint so it wont chip from the razor blade, you can still do this with powder painted heads but care must be taken not to chip your jighead. the rest of the tie is your choice of satin fibers, and flash if you prefer.
 

redear

Active member
Joined
Jun 24, 2010
Messages
1,297
Location
Waverly, Va.
If your wool body looks too bulky you can trim it down along the sides and just in front and under the hooks point to prevent interference, that last peice of wool along the back of the jig or rather belly in the swimming position is a little longer than the first peice, this seems to make the body shape and flow better. gently stroking back on the wool will improve it's shape too.
 

redear

Active member
Joined
Jun 24, 2010
Messages
1,297
Location
Waverly, Va.
I'll add some satin to it tomorrow for the finished jig. this was the raw wool that I had washed and dried, it works real well. I have a peice of unwashed wool laid out that has only been brushed out, thinking about just tying it up in a jig and comparing the raw and washed versions, they appear the same as far as form and shape goes but the unwashed smells like lanolin and it has a little smoothness to it and the color is a shade darker.
 

smalljaw

New member
Joined
Aug 25, 2012
Messages
1,442
Location
Pennsylvania
Thanks redear, I like how you did the top and then used a seperate piece for the back. When I tied my first one I was pulling all the fibers out and did wasn't going well so I took a good size piece and tied it in just like the second picture you have, once I did that I folded the wool over on itself and then simply used my fingers and blened it in. I did the same on the back back of the jig and then when I finished I pulled all the loose fibers back toward the tail until they came off. I was worried that I was going to pull all the wool off but it doesn't work tht way, it kind of lets you get the really loose stuff and the rest holds in place and it kind of shapes itself but once it goes in the water you really see how the wool soaks up water and ends up in that minnow shape.
 

smalljaw

New member
Joined
Aug 25, 2012
Messages
1,442
Location
Pennsylvania
There is no oubt that these are going to really clean up the crappie and bluegill, but I'm really wondering how they would work on bass, secifically river smallies as I can fish these jigs in areas that are n't full of weeds or wood. I'm betting that they do work and if for no other reason than the fish not seeing this type of jig before but I believe that the profile and action along with the satin reflecting UV light that they will not just work but work when nothing else does and I believe it so much that I bought 12 yards of sating and a ton of wool roving in like 8 different shades, they just fantastic especially the profile that redear makes.
 

redear

Active member
Joined
Jun 24, 2010
Messages
1,297
Location
Waverly, Va.
sure thing stumphunter! finished the jig that I started yesterday.
 

Attachments

  • tnnew jig.jpg
    tnnew jig.jpg
    3.8 KB · Views: 122
  • tnjiggy.jpg
    tnjiggy.jpg
    3 KB · Views: 121

redear

Active member
Joined
Jun 24, 2010
Messages
1,297
Location
Waverly, Va.
used satin in colors, white, black, and foil finish fabric fibers in green and dark blue, and silver, and also a few peices of silver holo. flashabou I think they call it. hard to get both sides of the jig looking identical but I don't think the fish will care.
 

redear

Active member
Joined
Jun 24, 2010
Messages
1,297
Location
Waverly, Va.
someone asked about a tutorial showing tying a wool jig, so I brought this to the top, how I do it anyway.
 

AtticaFish

Administrator
Staff member
Joined
Mar 22, 2010
Messages
5,445
Location
Attica, OH
You still have the original pics on your phone? If you send them to me i can try to make then a little bigger....
 

JUNGLEJIM1

Well-known member
Joined
Mar 23, 2010
Messages
3,176
Location
Saint Louis,Mo
Nice, I was thinking the same thing with the size of the pics. I don't see as good as I used to,wear glasses now when I tie. Had to put them on to get abetter look at these. Finished jig looks great.
 
Back
Top